Back to Tech Explorer
Sensor
Object Detection
IR Sensor Module Guide with Arduino
An IR (infrared) sensor is a simple, low-cost sensor used to detect objects in front of it without any physical contact. It works by emitting infrared light from an IR LED and measuring the infrared light that bounces back off a nearby object onto a photodiode. IR sensor modules are widely used in obstacle-avoidance robots, line-following robots, automatic hand sanitizer dispensers, and object counters.
In this guide, we will explore how the IR sensor module works, its key features, how to connect it to an Arduino, and example code to get you started on your own object-detection projects.
Detects
Objects
Output
Digital
Uses
Object Detection
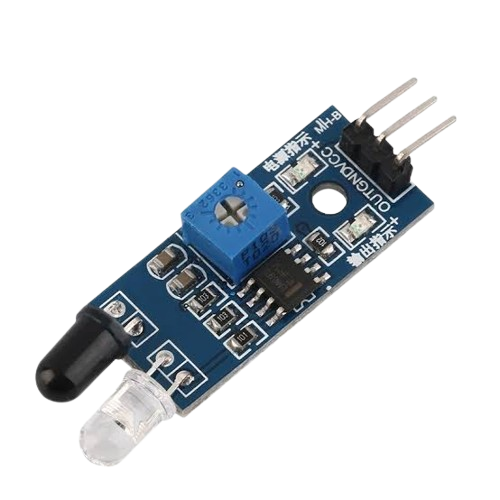
The IR (infrared) sensor is a simple, low-cost sensor used to detect objects in front of it without any physical contact. It works by emitting infrared light from an IR LED and measuring the infrared light that bounces back off a nearby object onto a photodiode.
- Operating voltage: 3.3V to 5V DC
- Detection range: approximately 2 cm to 30 cm (adjustable)
- Output type: digital TTL (HIGH / LOW)
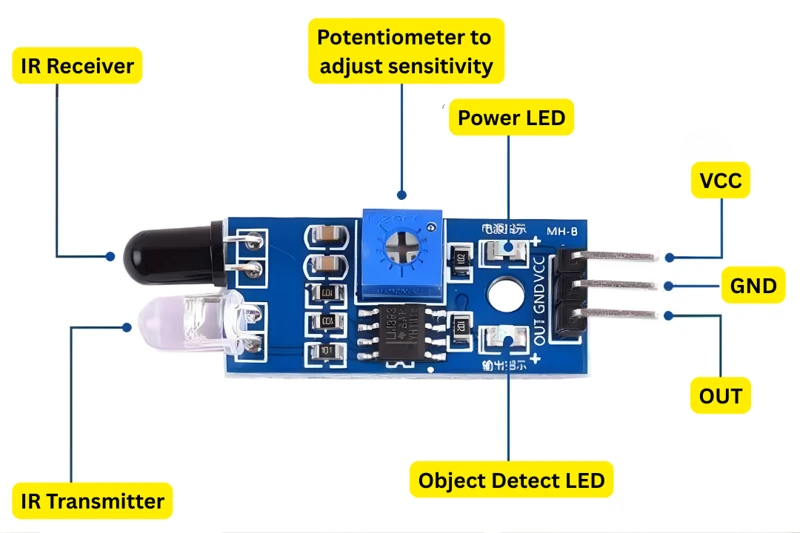
- Onboard potentiometer to adjust detection sensitivity/range
- Onboard status LED indicates when an object is detected
- Low power consumption, small and lightweight footprint
| Pin |
Type |
Description |
| VCC |
Power |
Power supply (3.3V – 5V) |
| GND |
Power |
Ground connection |
| OUT |
OUTPUT |
Digital signal: LOW when an object is detected, HIGH when clear (on most common modules) |
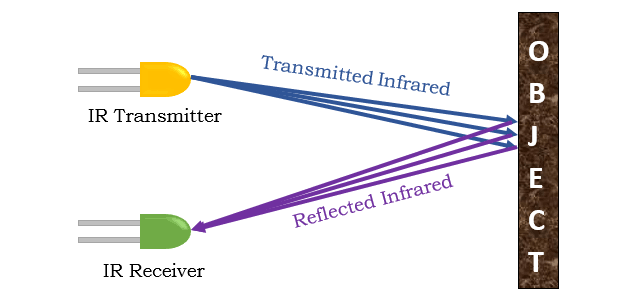
An IR sensor detects the presence of nearby objects without any physical contact. It works by emitting infrared light and detecting the reflection of that light off of objects in its range.
1
Emitting Infrared Light
The IR LED continuously emits infrared light, which is invisible to the human eye. This light travels outward from the sensor in a narrow cone.
2
Reflection and Detection
When an object enters the sensor's detection range, the infrared light emitted by the LED bounces off the surface of that object and reflects back toward the sensor module.
3
Detecting the Reflected Light
The photodiode (receiver) picks up the reflected infrared light. The closer or more reflective the object, the stronger the signal received by the photodiode. The onboard LM358 comparator compares this received signal against a reference voltage set by the onboard potentiometer.
4
Producing a Digital Output
Based on the comparator's result, the module sets its OUT pin HIGH or LOW: LOW when an object is detected within range, and HIGH when the path is clear. This digital signal can be read directly by a microcontroller such as Arduino, while the onboard status LED also lights up to give a visual indication of detection.
Using the Sensor with Arduino
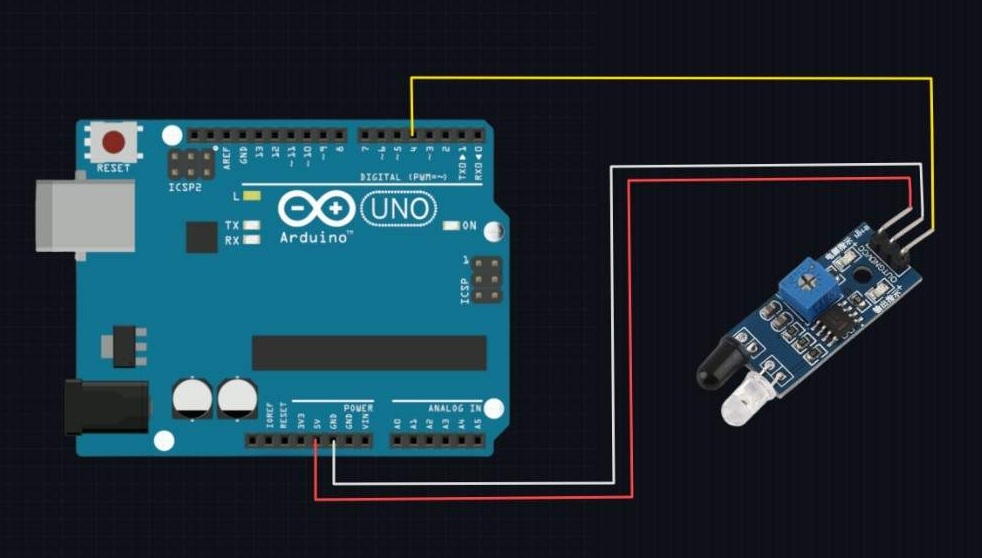
Wiring IR sensor to Arduino
| IR Sensor Pin |
Arduino Uno Pin |
| VCC |
5V |
| GND |
GND |
| OUT |
D4 |
Arduino Script
#define IR_SENSOR_PIN 4

void setup() {
  pinMode(IR_SENSOR_PIN, INPUT);
  Serial.begin(9600);
  Serial.println("IR Sensor Initialized...");
}

void loop() {
  int sensorState = digitalRead(IR_SENSOR_PIN);

  if (sensorState == LOW) {
    Serial.println("Object Detected!");
  } else {
    Serial.println("No Object");
  }

  delay(100);
}
The IR sensor module is a simple and effective way to detect objects without physical contact. By emitting infrared light and detecting its reflection, it can determine the presence of nearby objects. With its digital output, it can easily interface with microcontrollers like Arduino for various applications such as obstacle avoidance, line following, and object counting. Understanding how to wire and program the IR sensor opens up many possibilities for creating interactive and responsive projects.